This handbook aims to give you a quick guide to homemade electric scooters on a relatively small budget that can rival the new consumer brands costing over £1,200.
Please do not try to copy this design, as it is not guaranteed to work properly, I will make some changes to it. It’s really just a prototype. As with any form of transportation, remember to wear a helmet. These are dangerous and therefore I am not responsible for any injuries.
Step 1: The Deck
First, I recommend using a longboard deck instead of a skateboard, as this gives you greater stability, smoother ride and more room for components. It needs to be sturdy, almost without flexing and mounted on top, rather than falling off the truck, to make more room for the electronics housing and motor below. Randall.com’s chart illustrates the different options. That’s the ideal. .
As for the wheels, you need a large diameter and about medium softness for a smooth ride. Some wheels with plastic hubs, such as the Orangatang Kegel, are ideal for attaching pulleys to them. In my case, I just drill straight into my solid wheel. This works temporarily, but not necessarily for a long time.
Truck: At this point, you should consider the shape and design so that you can build the motor bracket for it (more on that later)
Therefore, as long as you follow this step, you can choose any booth you like. In my case, I make my own films to save money.
Step 2: The Electronics
Single motor and dual motor Settings. Usually, a larger lower KV motor would be sufficient, which in my case would cope well with climate change, and would be the cheaper option. That’s more than enough for a regular commute. The dual setup will provide more power and make it effortless to climb a hill, but the cost will be significantly increased. Therefore, for this tutorial, I’ll stick to a single setting.
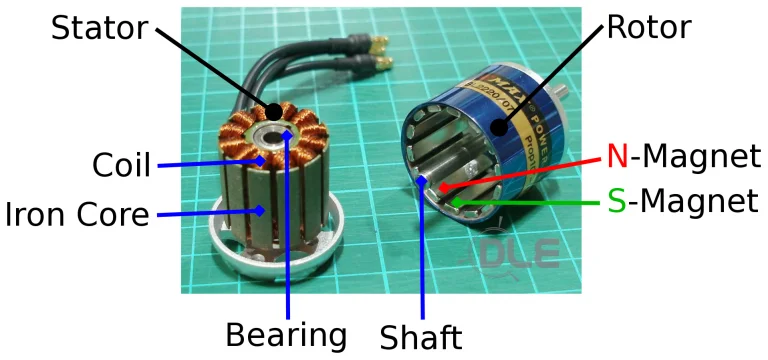
Electric motors: motors suitable for electric skateboards obviously need to have high power and high torque. Usually the brushless outer rotor used for remote-controlled aircraft is used. You need a low-kV controller, such as the 213kV Turnigy SK3 I used or the smaller NTM Prop Drive 270kV are good choices.
ESC: You need a speed controller that can support very high amps. These are usually identified by the HV under the name ESC. Buy a quality car, because cheap cars sometimes run out. The simplest option is to purchase a motor of your choice with a battery that plugs directly into it. But needs some soldering and adapter cables to make the motor and battery fit for my hobby. If you buy kits from him, that shouldn’t be a problem.
Batteries: Most people use lithium polymer (LIPO) in them. That’s because they provide tremendous power to the size and weight there. However, the main drawback of these batteries is that they are volatile and must be maintained with great care to avoid causing fire or damaging the batteries. That being said, if you charge them properly with a good balanced charger and don’t overcharge or keep them undercharged for a long time, they’re fine. The best alternative is LiFePO4, which holds less but still has a high power and is sometimes easier to manage.
Step 3: Drive System
The pulley is available from the in-line belt. I used a T5 pulley reduction gear of 36T to 14T and connected it with a matching synchro belt. This ratio is relatively important here, and it works very well for my 213 kV motor. For smaller motors, you may want to use 36T to 12T.
Motor mount: by mounting the motor directly onto the truck, there is little chance of the belt slipping off when turning. The bracket can be easily made of aluminum and welded to the truck. However, this makes fine tuning and getting the right tension on the belt more difficult.
To solve this problem, you can divide the motor mounting seat into two parts and add bolt holes to make these adjustments. I tried some designs (you can upload CNC files so you can work on them), but after a bit of Internet searching, I found that Aliendrivesystems did it! He provided an excellent solution for installing these motors on two different trucks, which was actually cheaper than commissioning CNC milling companies to manufacture their own. So I used his…
Step 4: The Enclosure
To protect batteries and other expensive components, you’ll need a sturdy housing. The main features should be good airflow, strong construction and a suitable method of securing the electronic equipment. For aesthetic purposes, I used brushed aluminum on the bottom plate and carbon fiber vinyl around the main body. Alternatively, you can use simple project attachments to save time.
get more info